Finding the correct bike seat height is one of the most important factors for comfortable, efficient riding and injury prevention. Set your saddle too low or too high, and you risk knee pain, loss of pedaling power, and general discomfort on the bike.
This guide will explain what determines the proper saddle height and how you can set your bike seat to the optimal position for your body.
Why Saddle Height Matters
Riding with the correct saddle height improves your pedaling efficiency and helps you avoid pain or long-term injuries. When your bike seat is at the right height, your legs can produce power on the pedals without overextending or overcompressing your knees. This translates to a smoother pedal stroke and better endurance on rides. A proper seat height also keeps your hips stable (no rocking side to side) and your lower back relaxed, since you’re not straining to reach the pedals or “squatting” too low with each stroke.
In short, setting the saddle height correctly is important for both performance and comfort on the bike.
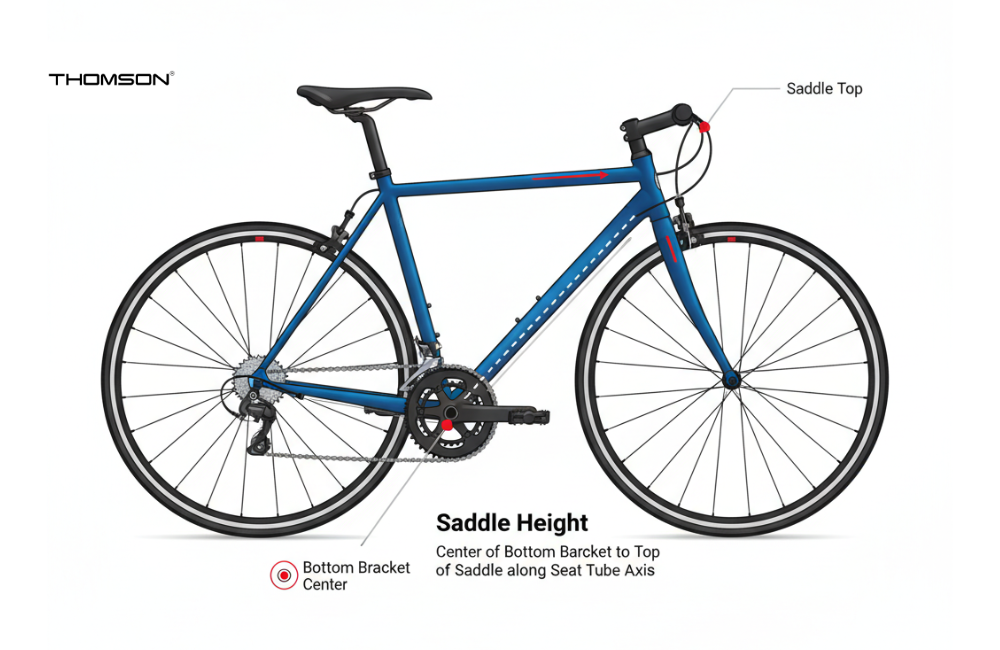
What Is Saddle Height? (And How to Measure It)
Saddle height refers to the distance between your bike’s saddle (seat) and the pedals. It’s often measured as the distance from the center of the bottom bracket (the crank axle) to the top of the saddle. This measurement is taken along the seat tube axis (the same angle as your seat tube), usually in a straight line following that tube.
Essentially, saddle height captures how high the saddle is relative to the pedal at its lowest point.
How to Determine the Correct Saddle Height
There is no single magic number for everyone’s bike seat height – it depends on your body proportions and riding style. However, there are a few methods to find a good starting point for saddle height. You can then fine-tune from that starting point to suit your individual needs. Below, we’ll cover three popular approaches:
1. Heel Method (Quick Fit Trick)
The heel method is a simple, equipment-free way to ballpark your saddle height. It’s often recommended as a starting point because it’s easy for anyone to try at home or even in a bike shop parking lot. Here’s how to do it:
- Step 1: Place your bike on a level surface. Sit on the saddle and position one of your pedals at the bottom of the pedal stroke (the 6 o’clock position, in line with the seat tube).
- Step 2: Keep your heel on that lower pedal. With the saddle at the right height, you should be able to just barely straighten your leg fully when your heel is on the pedal. In other words, your knee should be completely straight (locked out) when your heel is touching the pedal at the bottom of the stroke.
- Step 3: If your knee is still bent with your heel on the pedal, your saddle is likely too low – raise it until your leg straightens out. If you have to rock your hips or point your toes down to get your heel on the pedal, the saddle is probably too high – lower it until you can keep your hips level and heel on the pedal comfortably.
- Step 4: Once this is set, move your foot back to your normal riding position. Now when you pedal, your knee will have a slight bend at the bottom, since the foot is higher on the pedal than the heel was. This slight bend in the knee is what you’re aiming for.
The heel method effectively ensures you’re not overextending or underextending your leg. It’s a quick check you can do anytime. Keep in mind that this method is an approximation. It doesn’t account for individual nuances in flexibility or riding technique, but it usually puts you in the right neighborhood.
2. Inseam Formulas (LeMond Method and 109% Method)
Another common way to find a starting saddle height is to use your inseam length in a formula. The idea is that taller riders with longer legs will need higher saddles, and these formulas give a proportional estimate. Two popular formulas in cycling lore are:
The LeMond Method
Championed by Tour de France legend Greg LeMond, this formula says your bike saddle height (from bottom bracket to saddle top) should be about 0.883 × your inseam. To measure your inseam for this, stand barefoot against a wall and use a book pressed firmly up between your legs (mimicking a saddle). Mark the top of the book on the wall, then measure from that mark down to the floor. Multiply that measurement by 0.883, and that gives you a recommended saddle height along the seat tube from the bottom bracket.
The 109% Method (Hamley & Thomas)
This is a similar concept with a slightly different measurement. It comes from a research study by Hamley & Thomas and others, and it suggests your saddle height should be 1.09 × your inseam. However, in this case the height is measured from the top of the saddle down to the pedal axle. In practical terms, if your inseam is 80 cm, 1.09 × 80 = 87.2 cm from pedal to saddle. This ends up being a very similar position to the LeMond formula (just expressed differently because including the crank length in the measurement).
Both of these inseam-based formulas give you a useful starting point. They are quick and based on simple measurements, so a lot of riders and even bike shops use them as an initial setup guide. However, these formulas aren’t perfect for everyone. After setting your saddle by formula, you should still listen to your body and possibly adjust up or down a few millimeters for the best feel (more on fine-tuning later).
3. Knee Angle Method (Holmes Method)
The Holmes method sets saddle height by looking at your knee angle at the bottom of the pedal stroke. The target is a 25–35° bend in the knee when your foot is in the 6 o’clock position – a range that balances power and comfort. Too much bend (over 35°) means the saddle is too low, while a nearly straight knee (under 25°) means it’s too high.
Measuring requires a goniometer or video, but most riders can approximate it. A quick rule: 1 mm of saddle adjustment equals about 1° of knee angle change. If your knees feel cramped, raise the saddle slightly; if you’re reaching or toe-pointing, lower it.
Professional fitters often measure dynamically, but for most cyclists, aiming for a slight bend at full extension – without hip rocking or knee locking – will put you in the right spot.
Fine-Tune Your Fit with Thomson Seatposts
Small adjustments make all the difference. Thomson seatposts offer precise control and secure clamping, so your saddle height stays dialed every ride.
Signs Your Saddle Height Is Dialed In (or Not)
Once you’ve used one or more of the methods above to set a baseline saddle height, how do you know if it’s actually correct for you? The body gives plenty of feedback when your seat height is off. Here are some key signs and symptoms to watch for:
Signs of a Saddle Too Low
- Excessive knee bend: With a low saddle, you’ll notice your knees stay very bent. You might feel like you’re doing a partial squat each revolution. Often, pain at the front of the knee will develop over time because of the constant compression.
- Reduced power: You may find it hard to generate power or maintain speed because your legs aren’t able to extend through their strongest range. Climbing hills or pushing high gears can feel especially difficult.
- Heel-down pedaling: Riders with too low a seat sometimes drop their heels at the bottom of the stroke in an unconscious attempt to reach further. Your foot might feel angled downward a lot when pedaling.
- Sitting back on the saddle: You might find yourself shuffling backward on the saddle to gain extra leg extension. Scooting rearward effectively increases your leg reach a bit. If you’re constantly sliding back to compensate, it’s a clue your saddle could be low.
- Can flat-foot at stops: If, when you sit on the saddle, you can put both feet nearly flat on the ground, the saddle is definitely far too low for proper pedaling. Proper saddle height usually means only your toes can touch the ground while seated, not your full foot.
Signs of a Saddle Too High
- Hips rocking side to side: The most telltale sign of an overly high saddle is your hips swaying or rocking with each pedal stroke. Because the saddle is high, you have to reach to the bottom of the pedal stroke, causing your pelvis to seesaw.
- Pointing toes to reach: If your saddle is high, you might instinctively point your toes downward at the bottom of the stroke to reach the pedals. This toe-down pedaling is a sign you’re overextending.
- Back-of-knee pain or hamstring strain: An over-high saddle can cause pain in the back of your knees after riding. This results from the legs extending too straight, straining the tendons behind the knee.
- Sliding forward on the saddle: Some cyclists will slide toward the front of the saddle if it’s too high, in an attempt to get closer to the pedals and reduce the effective leg extension. If you notice you keep pushing yourself forward to reach comfortably, consider lowering the seat a bit.
- Knee locking out: You might notice that your knee almost or fully locks out at the bottom of the stroke when the saddle is too high. You never want your knee joints to lock out under load – there should always be that slight bend.
The “Just Right” Feeling
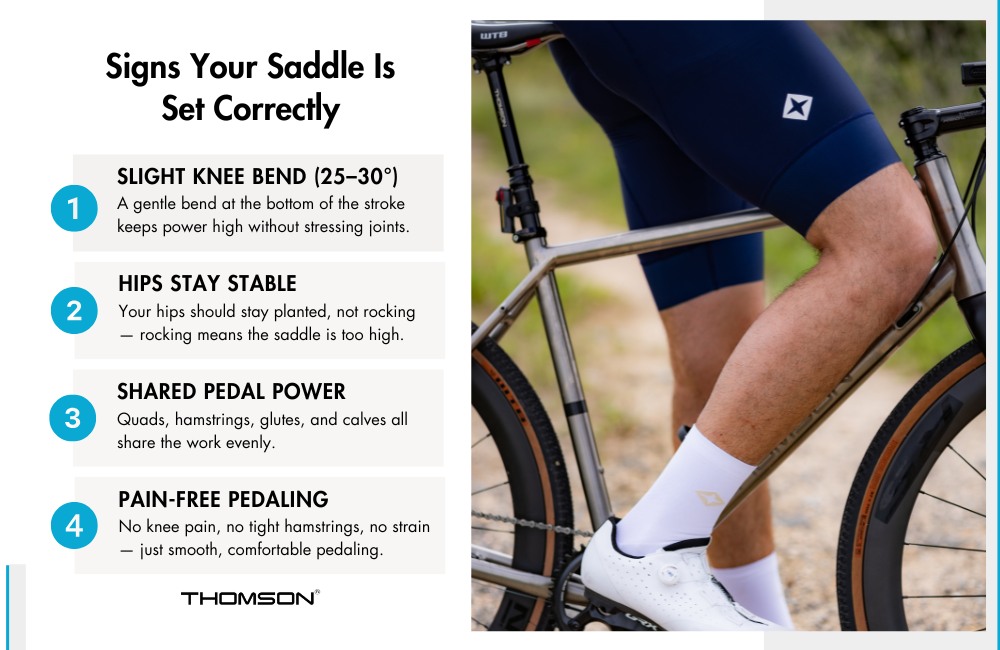
When your saddle height is dialed in correctly, you should experience:
- Proper knee bend: A slight knee bend (~25–30°) at the bottom of the pedal stroke, with no rocking hips and no toe-pointing needed. Your pedal stroke will feel smooth and fluid through the bottom – no feeling of a dead spot or of having to “reach” for the pedal.
- Stable body position: Your bottom stays planted on the saddle without sliding around, and your sit bones feel properly supported. A stable saddle position means your leg extension is comfortable as is.
- Balanced muscle engagement: You should feel like your quads, hamstrings, glutes, and calves are all contributing comfortably to the pedal stroke. If saddle height is correct, you’re neither overly quad-dominant nor over-stretching the hamstrings.
- No joint pain: Most importantly, a proper bike seat height will not cause pain in your knees during or after riding.
If all these boxes are ticked, congrats – your saddle height is likely in a great spot for you!
Fine-Tuning Your Saddle Height and Other Considerations
Using the methods and signs above, most riders can zero in on a comfortable saddle height range. From there, it’s wise to fine-tune with small adjustments and be mindful of other factors that can affect your bike fit:
Make small adjustments and test
A few millimeters can make a huge difference. When tweaking saddle height, adjust in small increments (~2–5 mm at a time) and then test ride. A common approach is to ride in a controlled environment while focusing on your pedal stroke. If something still feels off, adjust another couple millimeters and try again.
Account for changes in equipment
Different equipment can alter your effective saddle height. Switching to shoes with a thicker sole or a different pedal system (e.g. going from flat pedals to clipless pedals) can change the distance from your foot to the saddle by several millimeters. Even something like a new saddle model with thicker padding can effectively raise you up a bit. Whenever you change shoes, pedals, or saddle, double-check your saddle height and make small corrections if needed.
Additionally, crank length changes should prompt a re-check. If you move to shorter cranks, you may need to raise the saddle slightly, and if you use longer cranks, you might lower it, to maintain the same knee angle at extension.
Consistency across bikes
If you have multiple bikes (say a road bike and a mountain bike), try to set them up with consistent saddle height. Even though the bikes might feel different, your leg extension should ideally be the same to avoid confusing your body and causing overuse issues.
Mark your saddle height
Once you dial in the perfect height, it’s a good idea to mark it or remember it. Many seatposts have gradation marks or use a piece of tape or a scored line as a reference. This way if the seatpost slips or if you remove it for transport, you can easily return to your exact height. Using a quality seatpost with a strong clamp can make this process easier.
For example, precision seatposts like those from Thomson Bikes have secure clamping and let you adjust in fine increments – helpful traits when tuning saddle height. Always ensure the seatpost clamp is tightened properly so your saddle stays at the chosen height over rough roads and long rides.
When in doubt, consult a bike fitter
If you’ve tried the above and still can’t find a comfortable saddle height, it may be time to visit a professional bike fitter or a knowledgeable bike shop. A bike fitting expert will look at your entire riding posture (including cleats, handlebars, etc.) and can pinpoint the optimal saddle position for you.
Ride Strong with the Right Saddle Height
The correct height of a bike seat is not a one-size-fits-all number, but a personalized setting that balances your comfort and performance. Use proven methods as a starting point, then make small adjustments while listening to your body’s feedback. A well-adjusted saddle height lets you ride efficiently, free from pain, and with confidence on every pedal stroke.
At Thomson Bikes, we design precision seatposts and components that make dialing in your fit easier and more reliable. If you’re ready to get the most out of every ride, explore our seatposts and cockpit components built to keep your position solid mile after mile.
Ride Confident with Thomson Components
From seatposts to stems, Thomson builds precision components that keep you comfortable, efficient, and in control mile after mile.